There’s nothing like enjoying a roaring fire made with top-quality firewood. But if you want to get the most out of your firewood, you need to treat it well. Part of this is learning how to stack firewood the right way.
This post features a crash course on everything you need to know about stacking firewood, including essential tips and step-by-step instructions.
Of course, before you can learn to stack, you need to have firewood worth stacking. Here at Lumberjacks, we deliver premium kiln-dried firewood throughout the Greater Chicago region. The pure 16-inch hardwood pieces contain less than 20% moisture for quick ignition and the hottest, longest and cleanest burns.
All set with your premium wood? Good! Now, let’s review everything you need to know to stack firewood like a pro!
Why Stacking Firewood is Important
It’s important to stack your kiln-dried firewood because it will protect it from moisture, mold and pests. This is especially essential if you stack your firewood outside. Throwing your wood into a pile will allow moisture and pests to make a home. Moisture in your firewood creates mold, which makes it harder to burn and has more smoke. And pests anywhere are never fun!
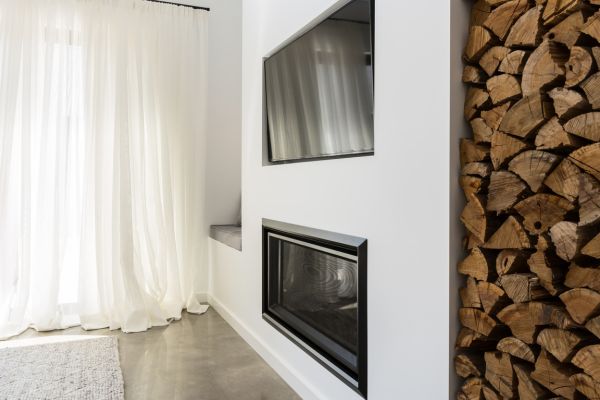
If you choose to store your wood inside, stacking it will keep your house clean and add a nice touch to your space. And if the wood is kiln-dried, you won’t have to worry about mold or pests in your home.
Learning how to stack firewood properly will keep your kiln-dried firewood pristine and ready to burn whenever you want to start a fire. Before we start stacking, let’s find the right place to put your stack.
Choosing Where to Stack Firewood
Location is everything when it comes to stacking firewood. If your stack’s surroundings aren’t just right, you could wind up compromising the wood’s quality or creating health and safety hazards.
Here are some best practices to keep in mind for where to stack firewood outdoors or indoors:
The Best Place for Outdoor Stacking
If you opt to stack your firewood outside, you need to find a sunny spot with good airflow. So, you’ll want to avoid any areas that get a lot of shade during the day. If you angle your stack against prevailing winds, the breeze will help keep your wood dry.
You should also keep your stack away from the side of your home. By nature, pests look for shelter in wood stacks. Keeping it away from your home lessens the risk of insects making their way inside and decreases the chance of a fire hazard.
You will also want to make sure your firewood stack doesn’t obstruct any pathways or exits in case of an emergency. Likewise, avoid stacking firewood under overhanging tree branches or powerlines that could fall and cause damage or fires.
Finally, be mindful of the drainage in any outdoor area where you stack. Don’t stack in a spot where water typically puddles in a rainstorm as this could lead to moisture ruining your wood.
The Best Place for Indoor Stacking
Stacking your firewood indoors is also an option if you order kiln-dried firewood from Lumberjacks. Our wood is safe to store indoors because it comes completely purified from all insects, mold, fungus and pesticides. So, you won’t have to worry about any unwanted visitors coming in with your wood.
Stacking kiln-dried firewood in a controlled indoor space is the safest bet for keeping it as dry and pure as it comes. However, you still need to be mindful of a few things about the indoor space you choose.
First, the room needs to have a good amount of airflow and low humidity. Storing the wood away in a stuffy attic or crawl space is a good way to turn pristine hardwood into a moldy damp mess.
The indoor space also needs to have enough space to contain your wood in a stable four-foot stack. Overcrowding a room with wood stacked above your head is a safety hazard and not recommended.
Some rooms people commonly use for indoor stacking include the garage, basement or living room near the fireplace.

Always Comply with Local Regulations
Lastly, remember that some regions have specific rules about firewood stacking. These regulations often pertain to the amount of firewood you can store, how close it can be to your or your neighbor’s house or whether it can be visible from the street. For example, cities in the Chicago region like Glencoe and Hanover Park have very specific firewood restrictions to be aware of. Make sure to familiarize yourself with these regulations to avoid potential fines and to stack your firewood in a safe, compliant manner.
6 Essential Rules for How to Stack Firewood
Properly stacking firewood can be the difference between dry, clean wood and wet and moldy wood. We’ll look at different techniques for stacking your kiln-dried firewood soon. But first, let’s look at some of the best ways to stack firewood, no matter which technique you choose:
1. Safety First
When properly stacking your firewood, you should wear gloves and boots to protect yourself. Splinters and wood falling on your feet aren’t worth it!
2. Raise It Off the Ground
Leaving your firewood on the ground is an invitation for moisture and pests to make their stay. So, we recommend raising your stack slightly off the ground to prevent water from seeping in. You can do this by laying down pallets, a board on cinder blocks or pressure-treated 2x4s before stacking.
3. Allow for Plenty of Airflow
You’ll want to stack your firewood loose rather than tight. Doing so will allow air to flow through the pieces of wood and keep them dry. Even though kiln-dried firewood has a very low moisture content, you’ll still want to stack with the end cuts exposed. The end cuts absorb the most moisture. If you stack them out to get more airflow, there’s a less likely chance that it can accumulate moisture.
If you stack multiple rows of firewood, make sure to leave at least a foot of space between the rows for airflow. The same goes for stacking near fences or other structures. Your stack needs at least a foot of space on all sides to breathe.
4. Trim Away Weeds and Plants
It’s also essential to keep the area around your wood stack clean. Allowing weeds or nearby plants to grow around your stack increases the chances of moisture staying around the pile. Foliage also provides cover for critters and insects, and they could find their way into your wood stack. Therefore, a good way to keep your stack clean is by trimming grass and weeds regularly.
5. Create a Stable Structure
The last thing you want is for your stack to fall over on you. Therefore, you should only stack on a level surface and avoid making stacks more than four feet high. Also, pay attention to the size of your firewood pieces. Stack larger pieces at the bottom of the pile and smaller ones at the top to keep the structure stable.
6. Give Your Stack Proper Coverage
When stacking outdoors, you need to give your firewood some protection from the rain. There are a few different firewood storage options for this. We recommend either loosely tying a tarp over the top of the pile or stacking it inside a log store.
Get more firewood tips and news delivered to your inbox!
6 Firewood Stacking Techniques to Try
There are a few different ways you can go about stacking your kiln-dried firewood. How much firewood you use may determine how you stack it. Most of the firewood stacking techniques come from different regions around the world. We’ll go over six different ways you can stack your firewood and the pros and cons for each method!
1. American Stacking Method
The American stacking method is simple. To stack this way, you would stack one layer of wood and then change the direction of the wood for each layer. For example, in one layer, all the wood is vertical next to each other. In the next layer, all the wood pieces are horizontal to each other.
These woodpiles are often narrow and long, creating easy access to individual pieces while blending into the background of a backyard, porch or deck. Typically anchor pieces are put vertically on either end of the pile. You can use pallets or some other type of material on the bottom of the stack to keep your firewood off the ground.

The pros of this method are that it’s easy to do and gives you easy access to grab wood whenever you need it. If you don’t have a lot of wood to stack, this might be the best method for you.
Keep in mind that if you stack it too tightly, it will be susceptible to moisture. This method does allow for some moisture, but the German, Norwegian and Shaker methods allow more airflow for your firewood.
2. The German (Holshausen) Stacking Method
The German method of stacking firewood, also known as Holshausen (wood house), is designed to allow air flow from the outside of the stack into the center. This way keeps all your wood pieces dry. You need to build this type of firewood stack in a very sunny spot. This stacking method needs the sun to create a convection current that flows the air throughout the pile.

To stack the German way, you’ll build a ring on the ground using pressure-treated 2×4’s. Depending on the length of your 2×4’s, you may need to cut them in half (or smaller) to form a ring with these pieces. This base will protect your firewood from absorbing moisture from the ground. Then follow these steps:
- Construct a ring of firewood, with the bark side facing out. Make sure to place this ring on your base.
- Lay one piece of your firewood leaning against the ring.
- Repeat step 3 until you have one row.
- Start the next row by placing the firewood around the ring like your first row – sloping downward.
- Continue step 4 until you have reached about six rows high. Then stack a ring on top with the bark facing out to act as structural support.
- Repeat steps 3-6 until your pile is three levels high or about 18 rows tall.
- Place firewood in the middle of the ring to fill the space.
The German method is one of the best ways to stack your wood because it ensures it stays dry and ready to burn. It also looks fun and gives your yard some aesthetic appeal.
This method is also an excellent option to season wood throughout spring and summer. However, because kiln-dried wood already comes as dry as it needs to be, you won’t need to worry about making sure it’s ready for firewood season. You’ll just need to make sure it stays ready throughout the season.
3. The Shaker (Amish) Stacking Method
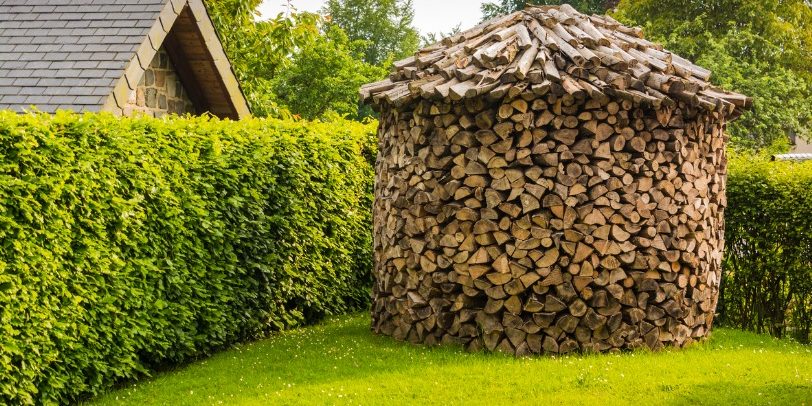
The Shaker method, also known as the Amish method, is a round formation in which the sticks touch at one end but spiral out with bigger gaps at the opposite end. This method is similar to how you build the German stack, but it turns out more rounded.
Not only are these round woodpiles aesthetically pleasing, but they also are better than the traditional rectangular-shaped woodpile. This method based on the old-school Amish technique holds more firewood than modern stacking methods, offers superior stability and helps to repel water and dry out wood faster.

The first layer of a Shaker stack looks a little like spokes on a wheel. It’s perfect for oddly shaped logs, adding a nice visual presence to the yard. This method is quick, stable, and dries wood fast. To create a shaker woodpile of your own, follow these steps:
- Place a piece of firewood, that measures about 8 inches x 16 inches, in the center of your base. Build a circle of split logs that looks like a wheel’s spokes, at least two rows high.
- Put two split logs above the center of the circle and lean your firewood against them. Continue to add layers until the wood reaches your shoulder and creates a disc shape.
- Stop building the stack when the top forms a cone and you can’t add any more wood.
This technique is probably the best way to stack your wood, as it’s easy, and you can hold more firewood. It also keeps your wood dry throughout the season.
4. The Norwegian Stacking Method
The Norwegian stacking method builds large rounds of wood formations with barked firewood covering the top. The barked firewood protects the underlying firewood from the elements. The Norwegian, like the Shaker and German methods, has the look of a “house.”

This method is another way to let air flow through your wood stack, keeping it dry for the season. To do the Norwegian technique, follow these steps:
- On a pallet or pressurized 2×4, start laying logs in a circular fashion.
- As the circle continues to rise, fill the middle with uneven or smaller pieces of wood. This provides support and prevents inward collapse.
- When the stack is about 3.5 feet high, top off your stack with smaller pieces of wood with the bark facing out.
This approach tends to have the same pros as the Shaker and German methods. You’ll get more airflow, and it looks good in your yard.
5. The End Pillars Stacking Method
The end pillars stacking method is one of the most common methods to use. Like the American method, this style arranges the wood in a long and narrow way. The difference is that the pillars that hold the stack are created out of pieces of firewood.

It’s best to stack your firewood so the cut ends are facing east and west. Placing it that way will allow sunlight and wind to keep the woodpile dry. Here are the steps to use the end pillar stacking method:
- Create a base of three-four parallel rows, either of treated 2x4s or pallets.
- Build your end pillars at each end of the base by laying 3-4 pieces of firewood right next to each other.
- Next, lay another 3-4 pieces on top of your first layer in the opposite direction.
- Repeat the previous 2 steps until your pillar is 12 rows high.
- After your pillars are created, stack your firewood between them until it’s as high as the pillars.
You’ll want to be sure to stack loosely with this method, as there aren’t many options for this kind of stack to get airflow.
This style of stacking will also look good in your yard, as you can stack it up against your fence or use it as a backdrop for your yard or patio.
6. The Criss Cross Stacking Method
The criss cross method, or only pillars, is building pillars and repeating them until all your wood is stacked. You start this method the same way you begin the end pillars method, except you only construct the pillars.

Here are the steps to stack the criss cross method:
- Create a base of three-four parallel rows, either of treated 2x4s or pallets.
- Build your end pillars at each end of the base by laying 3-4 pieces of firewood right next to each other.
- Next, lay another 3-4 pieces on top of your first layer in the opposite direction.
- Repeat the previous 2 steps until your pillar is 12 rows high.
Be sure to keep a few inches of space in between each pillar so air can flow between the individual stacks. This method is simple and allows for easy access. It also has a nice look against your fence or as a backdrop to your yard.
Want to learn more about how to use the best quality wood?
Ready to Start Stacking?
We hope this guide has helped you learn more about how to stack firewood and the many ways you can do it! Thankfully, you have options when it comes to stacking your kiln-dried firewood.
Do you want more wood to stack? At Lumberjacks, we deliver high-quality kiln-dried firewood throughout Northern Illinois and Southern Wisconsin – including cities like Barrington, Joliet, Palatine and many more! We also have locations in Woodstock and Lake in the Hills, IL, where you can stop by and pick up some of your own!
Please call us today at 815-337-1451 or click below to learn more about our luxury firewood!
Editor’s Note: This blog was originally published in October 2021 and updated in June 2023.


